July 27, 2017

First Impressions: Jamberry Nail Wraps

 Sample.
 
Welcome to Samantha by the Sea! I recently tried out some Jamberry Nail Wraps and I wanted to share my thoughts with you!

 
I received the wraps in the "June Host Exclusive" pattern, a nail file, a nail prep wipe, and moisturizing hand creme. I loved the pattern of the wraps, as I felt that the purple and red really complemented each other. 


 Application Steps:
1. Prep your nails by pushing back your cuticles and wiping them with the nail prep wipe.
2. Match your nails to the wraps, so you can find the best fitting wrap for each nail.
3. Cut the nail wrap in half and remove it from the clear sheet with an orange stick (or similar tool).
4. Warm the adhesive on the non-patterned side. I used a blow dryer for 3-5 seconds on medium heat.
5. Apply wrap to nail and smooth the wrap down.
6. File off the excess using a downward motion. 
7. Apply heat to the wrap and smooth it out to make sure it is secure.

In total the application for both of my hands took around 30 to 40 minutes. I did not apply top coat, as it was not on the instruction sheet.


 I experienced some creasing in the nail wrap toward the end of my nail that I was not able to smooth down. I also noticed that the wraps did not fit my nails as well as I would have hoped. If I use these wraps in the future, I will make sure to cut some of the excess off of the sides. I would also recommend applying top coat, especially on the tips, because I was able to feel the wraps catching on my sheets.

If I needed a quick manicure that I didn't have to worry about smudging, I would use these again. 

If you are looking for a Jamberry consultant or are interesting in trying Jamberry, check out the lovely lady who sent these to me to try, Kelly! You can find her website by going to JamWithKelly.com. You can also find her on Instagram @JamWithKelly!

What do you think? Have you given Jamberry a try? I would love to hear your thoughts below!

July 24, 2017

Alba Botanica Hawaiian Detox Sheet Mask

 I bought this.

Welcome back to Samantha by the Sea! Today I wanted to share with you my thoughts on the Alba Botanica Hawaiian Detox Sheet Mask with anti-pollution volcanic clay.


Price: $2.50 USD

Claims: The goal of this mask is to mirco-extract pollutants from the skin and to dissolve debris. The end result should be fresh, bright, and renewed skin.

Fit: This black colored sheet mask did not fit on my face well. I had to stay extremely still during the fifteen minutes that I wore this mask because if I did not, it would move and start to touch my eyes.

Essence: The mask had a milky essence. It saturated the entirety of the mask and there was little to no essence left in the pouch.

Smell: The smell of this mask was horrible. Based on the smell alone I would not repurchase this mask.

Results: After fifteen minutes of wear I could not handle the smell anymore and the mask started to burn my face, so I removed it. Instead of letting the rest of the essence seep into my skin I washed it off using cold water, as I had to get rid of the burning sensation. Once the burning sensation stopped, my skin felt soft and firmed. 

I was excited to try this mask, but the smell, combined with the fit and burning sensation I experienced, are why I am not recommending this sheet mask. After looking at some of the reviews on Amazon (it received a 1.4/5), I know that I am not alone in this decision. There are plenty of other similarly priced sheet masks out there that are way better quality.

If you have any recommendations for good skin detoxing sheet masks, let me know below!

July 19, 2017

Pastel Dry Brushed Nail Art

Welcome to Samantha by the Sea! Today I would like to share another nail art look with you! 


I used the dry brush technique for this look! If you haven't heard this technique before, it is when you wipe almost all of the polish off of the brush before applying it to the nail. As always, I started off with my Revlon Colorstay Gel-Smooth Base Coat. For the base color, I used Dream by PS Cosmeceutical in Southern Sand. I used Zoya Lillian, Neely, Kirtridge, and Cole for the dry brush technique. I sealed everything in with Sally Hansen Insta-Dry Top Coat.

Overall, I'm loving this - so much so that I'm already planning out my next dry brush look!

What do you think? I'd love to know in the comments below!

July 17, 2017

Ipsy Glam Bag Reveal: July 2017

I bought this.
 
Welcome to Samantha by the Sea! Today I would like to share with you what I received in this month's Ipsy bag! This month's theme was Over Easy and the lazy day vibes were definitely present!


The Bag
This month's bag had Gudetama, the lazy egg, on it. The silver pull tag said "meh..." on it, which was also super cute! As always, the quality of the bag was great! 

The Contents
Beau Gâchis Illuminator Brush ($10): A vegan, cruelty free, and eco-friendly brush that can used however you'd like! 
Too Faced Better Than Sex Mascara in Black ($12): This mini-sized mascara is perfect to create voluminous and long lashes.
Nomad Cosmetics Illuminating Highlighter in Midnight Sun (approx. $10): A soft and shimmery golden highlighter that gives the face a perfect glow.
Hanalei Lip Treatment in Rose ($12): A moisturizing pink-tinted lip treatment that is perfect for everyday wear.
Eyeko Skinny Liquid Eyeliner in Black (approx. $11): This liner has a sharp felt tip and is very opaque, making it easy to create the perfect wing.

The Review
Overall, I'm extremely happy with this bag! Gudetama is adorable on the bag and I really liked all of the products I received this month. I even got to choose the Nomad Cosmetics highlighter! As the months go on and Ipsy gets to know me, I'm liking what I receive more and more. This bag retailed for approximately $55 USD!

Do you want to subscribe to Ipsy? Use my referral link on the sidebar or can click here

If you are subscribed to Ipsy, how was your bag this month? I'd love to hear all about it below!

July 15, 2017

Avon NutraEffects Ageless Eye Cream

 Sample.
 
 Welcome to Samantha by the Sea! Today I wanted to share with you a new addition to my skincare routine: the Avon NutraEffects Ageless Eye Cream.


Avon claims that this eye cream is non-greasy, suitable for sensitive skin, provides twenty-four hour moisturization, and smooths the appearance of fine lines and wrinkles. Their overall claim is that it will replenish and hydrate the eye area for a noticeable younger, firmer, and lifted look.


I've used this product every night for three weeks and I am happy to say that I can back up all of Avon's claims! Because I have "twenty-something" skin, I cannot attest to any of the long term anti-aging claims; however, this product has helped to reduce the few small wrinkles I have around my eye area. This product is targeted more toward skin that is already seen the effects of aging, so I can only imagine the positive impact it could have on aging skin.

 I will definitely keep this product in my skincare rotation, as it does everything that I need an eye cream to do! It has a smooth consistency that easily seeps into my skin, leaving my under eyes moisturized all day. Additionally, a little bit goes an long way with this product, so even though I've used it quite a bit the jar looks virtually untouched.


The Avon NutraEffects Ageless Eye Cream costs $18 USD for 0.5 fluid ounces. It can be purchased online through an Avon Representative.

Have you tried anything from Avon? I'd love to hear your recommendations below!

July 13, 2017

Pastel Ikat Nail Art

 I bought this.

Welcome to Samantha by the Sea! Today I wanted to share with you a pastel ikat nail art look that is perfect for summer!


To start off, I used the Revlon Colorstay Gel-Smooth Base Coat. I applied two coats of Pure Ice He Rocks My World as the base color. Once that was dry, I placed Wet N Wild French White Crème anywhere that I wanted an ikat design. I then placed Zoya Lillan in the center of the white and accented everything with the L.A. Colors Art Deco Nail Art Striper in Black. I sealed everything in with Sally Hansen Insta-Dry Top Coat.

I am really loving this look! Not only is it perfect for summer, but the colors can be switched up to match any occasion. 

What do you think? Let me know below!

July 10, 2017

Drugstore Favorites: Summer Edition

 I bought this.
  
Welcome to Samantha by the Sea! Today I wanted to share with you my favorite products from the drugstore that I use during my everyday summer makeup routine! 


Physician's Formula Butter Bronzer in Bronzer: This is the perfect bronzer for my skin tone! It leaves me perfectly bronzed and it is very blends very well. It has a coconut scent that reminds me of the beach, but once applied the scent fades quickly.

Rimmel London Stay Matte Pressed Powder in 004 Sandstorm (top) and 003 Natural (bottom): I use 003 Natural for underneath my eyes and 004 Sandstorm for the rest of my face. I love these powders, as they help control oils and leave me looking matte all day.

Wet n Wild Illuminating Palette in 320 Catwalk Pink: This was the first highlighter I ever used! On days when I'm wanting more of a pink-toned highlight I'll use this. When I wanting more of a gold-toned highlight I prefer to use Wet n Wild 321B Precious Petals

Maybelline Brow Drama in Deep Brown: I'm not a fan of my eyebrows when they are completely filled in, so this is the best option for me! Not only does it help to define my brows, but it deepens the color as well.

Wet n Wild Photo Focus Setting Spray: I apply this after I've applied all of my powder products and before I apply my mascara. This spray helps to lock in my makeup and helps it to last all day.

Maybelline Master Conceal Camouflaging Concealer in 30 Light/Medium: This concealer is one of my favorites! I use it to spot conceal any blemishes I may have. The coverage is full enough to cover problem areas, while feeling light weight. 

Maybelline Lash Sensational in Blackest Black: This is my holy grail mascara - if I could buy it in bulk I probably would! I usually apply three coats to my top lashes and one coat to my bottom lashes. I love this mascara because it helps to define each individual lash and makes my eyelashes look long and voluminous!


Overall, I love each one of these products! I don't anticipate them leaving my makeup rotation anytime soon. 

What are your favorite products from the drugstore? I'd love to hear about them in the comments below!

July 5, 2017

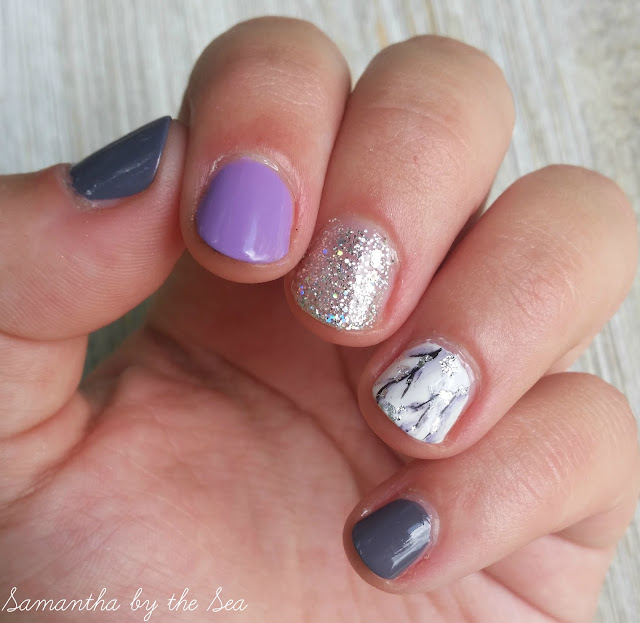
Marble Nail Art

 I bought this.
Welcome to Samantha by the Sea! Today we will be exploring a hobby from my past, nail art! Nail art was a hobby of mine for quite a few years (I even blogged about it!), but I sadly fell out of it. I'm starting to get back into nail art, so I thought I'd take you on that journey with me!

Marble Nail Art OPI LA Colors Pure Ice Sally Hansen

For this marble inspired look I started off with my holy grail base coat, Revlon Colorstay Gel-Smooth Base Coat, on all of my nails. For the marble nail art I loosely followed a tutorial by Nina Nailed It. I started off with two coats of Wet n Wild French White Cremé. For the marbled look I used a mixture of a black sharpie marker and rubbing alcohol on a nail art brush. I accented it with L.A. Colors Art Deco Nail Art Striper in Black. Once I completed my desired marble look, I added silver foil pieces to bring the look together.
 
As for the rest of my nails, I applied two coats of Sally Hansen Jam Sesh on my index finger, two coats of OPI In True Stefani Fashion on my middle finger, and two coats of Pure Ice Shining Knight on my pinky finger and thumb. I topped everything off with a thick coat of Sally Hansen Insta-Dry Top Coat.

I feel like this was the perfect look to ease myself back into nail art! While I know that there are some improvements to be made, I'm extremely happy with the overall look!

Have you ever tried sharpie nail art? Do you have any suggestions for what I should try next? Let me know in the comments below!

July 2, 2017

Formula 10.0.6 Moisturizing & Brightening Peel Masks

I bought this.
 
Welcome to Samantha by the Sea! I'm so glad you're here! Today I wanted to share with you two of my favorite peel masks from Formula 10.0.6! I know I post about this brand often, but it is because I truly love their products and I can see the difference in my skin from using them!

I found Formula 10.0.6 at Ulta a few months ago and the brand has become a major part of my skincare routine. Everything is reasonably priced and their masks are priced around $7 USD!


The Be Berry Smooth Moisturizing Peel Mask is infused with blueberry and pineapple. It is a purple tinted gel-like mask that applies clear. I normally apply it, like the rest of my masks, with a brush to ensure that there is an even application of the product. After about 10-15 minutes, or once the mask is completely dry, I peel it off. This mask smells great and leaves my skin feeling rejuvenated! 

The Get Your Glow On Skin Brightening Peel Mask is infused with papaya and citrus. This mask is an orange tinted gel-like mask that also applies clear. I apply it with a brush and once it is dry I peel it right off! This mask has a sweet smell and it helps to renew my dull looking skin.

 I use each of the masks about once a week, alternating them between mud masks. Unlike other peel masks I've tried, both of the masks peel off easily in one piece if I wait long enough for them to dry. I'd highly recommend these masks and I will definitely be repurchasing them once I run out! Both masks make my skin feel refreshed and they give my skin a more hydrated and glowy look. I look forward to trying even more of the peel masks from Formula 10.0.6!

Do you have any recommendations for peel masks or face masks in general? Let me know below!